Running the test
The Uniocular Field of Fixation (UFF) refers to the maximum uniocular excursion of the eyes in various directions of gaze. This is assessed by presenting the patient with an optotype of a size just above the foveal acuity threshold. The optotype is moved from the centre of the field outwards until the patient reports that it "goes blurred". This occurs at the limit of excursion in that direction of gaze and the target moves off the fovea.
Running the test
- The patient is positioned in front of the Patient screen with their head restrained by a forehead/chin rest.
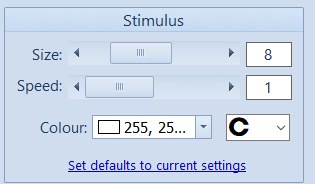
- A Landolt C or a Tumbling E target is selected form the Stimulus options.
- With the target in the central of the field and the patient looking directly at it, the size of the optotype should be decreased until it is just above the foveal acuity threshold so that the patient can identify its orientation.
- The optotype can then be moved along each radial manually using the scroll bar at the bottom of the screen or moved automatically by selecting Scroll (S on keyboard).
- As the optotype moves eccentrically, the patient is asked to report when it first "goes blurred". This indicates that the eye has reached the limit of movement in this direction of gaze and the optotype has moved of the fovea.
- The examiner clicks Record or presses the Space Bar when this occurs and this eccentricity is automatically recorded. The spot is then automatically moved back towards the centre and is then scrolled along the next radial line. This process is repeated until all radials have been examined. To clear the results for the current radial, select Clear radial.
- To save the results, first select the name of the screener from the pull-down list and enter any notes relating to the test, then select Save. To clear all recorded results and restart the test, select Reset. To cancel the test and return to the main administration screen select Cancel.

Stimulus options
The type and orientation of the optotype displayed and its size can be changed from the Stimulus options panel. A preview of the current stimulus is displayed.
The speed that the stimulus is moved when being scrolled can be varied using the Speed scroll bar.
The default settings for stimulus size and scrolling speed can be set to the current values by selecting Set defaults to current settings.
Setting the stimulus axis and eccentricity
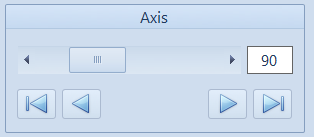
The axis that the stimulus traverses along and the eccentricity can be readily changed using the controls in the Axis and Eccentricity panels.
Axis scroll bar: this determines the current axis along which the stimulus moves. This ranges from 0-345 degrees in 15 degree increments.
Clicking on the arrows below the scroll bar increment/decrement the axis in 15 degree intervals and reset the axis to 0 and 180 degrees.
If Measure cardinal directions only has been selected, the radials will be restricted to the cardinal directions of action of the six extra-ocular muscles.
The axis can also be selected by simply clicking on the required axis on the control screen.
Eccentricity scroll bar: this determines the current eccentricity of the stimulus (0 being the centre of the screen).
![]()
Clicking on the arrows below the scroll bar increments/decrements the eccentricity and the restart button resets the eccentricity to zero.
The Scroll button automatically increments the eccentricity. The speed of movement is determined by the Speed scroll bar described above.
The Record button records the current target eccentricity and axis.
The axis and eccentricity can also be selected by simply clicking at the corresponding point on the control screen.